Joystick Mapping
Connect your gamepad to robot movements
What is Joystick Mapping?
Joystick mapping is the process of taking inputs from your gamepad (joysticks, buttons, triggers) and translating them into robot actions. It's how you make your robot respond when a driver moves a stick or presses a button.
Think of it like configuring controls in a video game — you decide what each button does!
Understanding Gamepad Inputs
FTC uses standard game controllers (like Xbox or PlayStation controllers). Each controller has several input types:
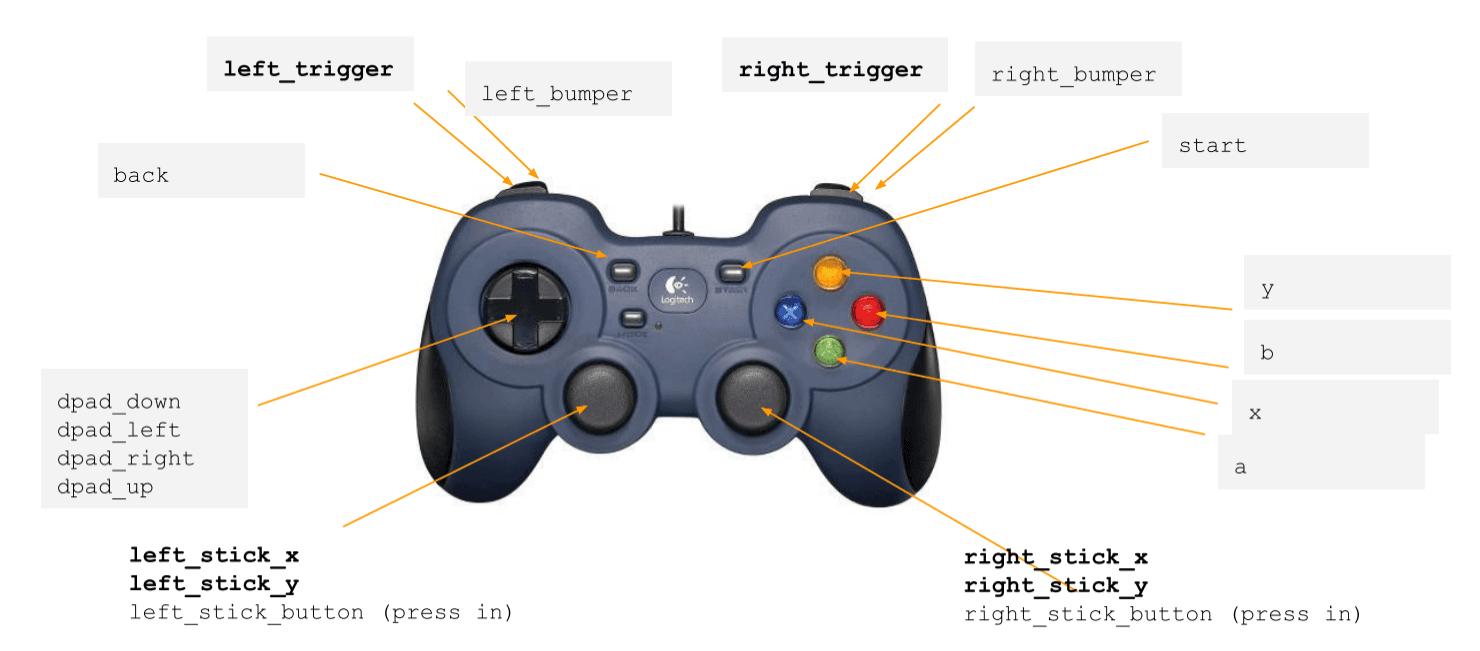
Analog Inputs (Joysticks & Triggers)
- Values range from -1.0 to 1.0 (or 0.0 to 1.0 for triggers)
- Smooth, gradual control
- Perfect for driving and precise movements
Digital Inputs (Buttons & D-pad)
- Values are true or false
- Instant on/off actions
- Great for toggles and single actions
Basic Drive Control
The most common joystick mapping is for your drive base. Here are the main styles:
Tank Drive
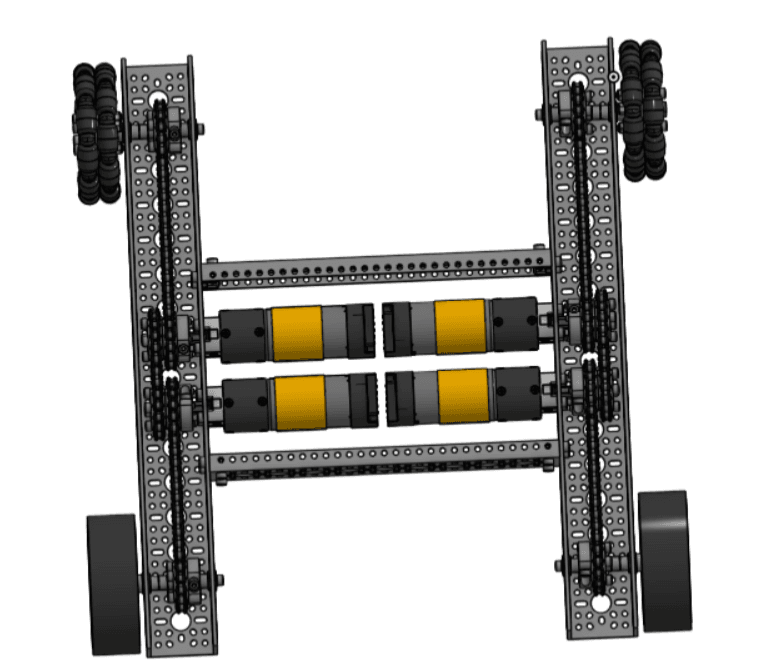
Each side of the robot is controlled by a separate joystick — just like driving a tank! Most FTC robots use 4 or 6 wheels for better traction and stability.
@TeleOp(name="Tank Drive")
public class TankDrive extends LinearOpMode {
    private DcMotor frontLeft;
    private DcMotor frontRight;
    private DcMotor backLeft;
    private DcMotor backRight;

    @Override
    public void runOpMode() {
        // Initialize all 4 motors
        frontLeft = hardwareMap.get(DcMotor.class, "front_left");
        frontRight = hardwareMap.get(DcMotor.class, "front_right");
        backLeft = hardwareMap.get(DcMotor.class, "back_left");
        backRight = hardwareMap.get(DcMotor.class, "back_right");

        // Reverse right side motors so they drive in the same direction
        frontRight.setDirection(DcMotor.Direction.REVERSE);
        backRight.setDirection(DcMotor.Direction.REVERSE);

        waitForStart();

        while (opModeIsActive()) {
            // Left stick controls left side
            double leftPower = -gamepad1.left_stick_y;

            // Right stick controls right side
            double rightPower = -gamepad1.right_stick_y;

            // Apply same power to motors on each side
            frontLeft.setPower(leftPower);
            backLeft.setPower(leftPower);
            frontRight.setPower(rightPower);
            backRight.setPower(rightPower);

            telemetry.addData("Left", leftPower);
            telemetry.addData("Right", rightPower);
            telemetry.update();
        }
    }
}@TeleOp(name = "Tank Drive")
class TankDrive : LinearOpMode() {
private lateinit var frontLeft: DcMotor
private lateinit var frontRight: DcMotor
private lateinit var backLeft: DcMotor
private lateinit var backRight: DcMotor
override fun runOpMode() {
// Initialize all 4 motors
frontLeft = hardwareMap.get(DcMotor::class.java, "front_left")
frontRight = hardwareMap.get(DcMotor::class.java, "front_right")
backLeft = hardwareMap.get(DcMotor::class.java, "back_left")
backRight = hardwareMap.get(DcMotor::class.java, "back_right")
// Reverse right side motors so they drive in the same direction
frontRight.direction = DcMotor.Direction.REVERSE
backRight.direction = DcMotor.Direction.REVERSE
waitForStart()
while (opModeIsActive()) {
// Left stick controls left side
val leftPower = -gamepad1.left_stick_y.toDouble()
// Right stick controls right side
val rightPower = -gamepad1.right_stick_y.toDouble()
// Apply same power to motors on each side
frontLeft.power = leftPower
backLeft.power = leftPower
frontRight.power = rightPower
backRight.power = rightPower
telemetry.addData("Left", leftPower)
telemetry.addData("Right", rightPower)
telemetry.update()
}
}
}Why the negative sign? Joysticks return negative values when pushed up, but we usually want forward to be positive power. The negative sign flips this to feel more natural.
X-Drive (Holonomic)
X-Drive is a holonomic drivetrain that uses 4 motors mounted at 45-degree angles. This allows your robot to move in any direction and rotate independently — all at the same time! It's one of the simplest holonomic designs to understand and program.
What makes it holonomic? Your robot can strafe (move sideways) without turning. Traditional drives must turn to face the direction they want to go, but holonomic drives move freely in any direction.
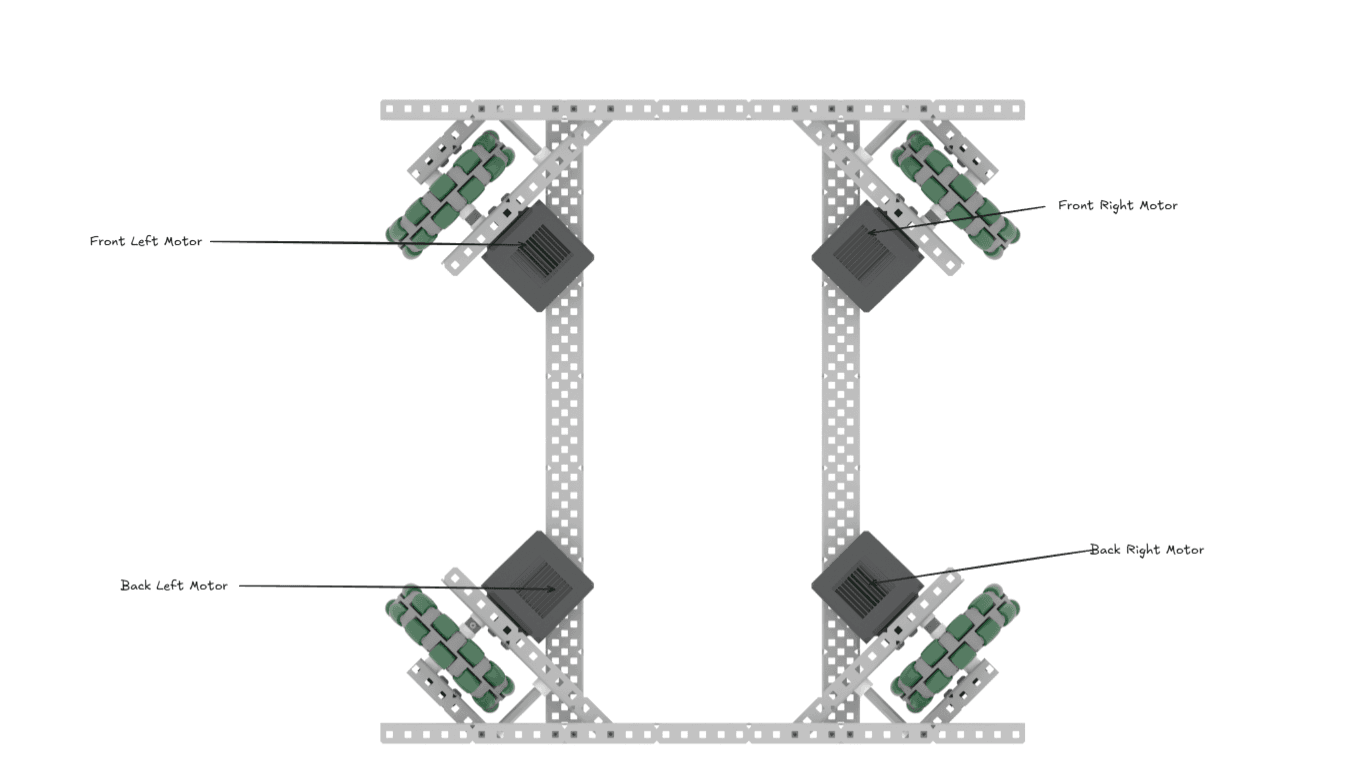
Motor Layout: Motors are positioned at the 4 corners, rotated 45° so they point toward the corners of the robot. Typically using omni wheels or mecanum wheels.
@TeleOp(name="X-Drive")
public class XDrive extends LinearOpMode {
    private DcMotor frontLeft;
    private DcMotor frontRight;
    private DcMotor backLeft;
    private DcMotor backRight;

    @Override
    public void runOpMode() {
        // Initialize motors
        frontLeft = hardwareMap.get(DcMotor.class, "front_left");
        frontRight = hardwareMap.get(DcMotor.class, "front_right");
        backLeft = hardwareMap.get(DcMotor.class, "back_left");
        backRight = hardwareMap.get(DcMotor.class, "back_right");

        // Reverse right side motors
        frontRight.setDirection(DcMotor.Direction.REVERSE);
        backRight.setDirection(DcMotor.Direction.REVERSE);

        waitForStart();

        while (opModeIsActive()) {
            // Get joystick inputs
            double drive = -gamepad1.left_stick_y;   // Forward/backward
            double strafe = gamepad1.left_stick_x;   // Left/right
            double turn = gamepad1.right_stick_x;    // Rotation

            // Calculate power for each motor
            // The math works because of the 45° motor angles
            double frontLeftPower = drive + strafe + turn;
            double frontRightPower = drive - strafe - turn;
            double backLeftPower = drive - strafe + turn;
            double backRightPower = drive + strafe - turn;

            // Find the maximum power value
            double maxPower = Math.max(Math.abs(frontLeftPower),
                              Math.max(Math.abs(frontRightPower),
                              Math.max(Math.abs(backLeftPower),
                                       Math.abs(backRightPower))));

            // Normalize powers if any exceeds 1.0
            if (maxPower > 1.0) {
                frontLeftPower /= maxPower;
                frontRightPower /= maxPower;
                backLeftPower /= maxPower;
                backRightPower /= maxPower;
            }

            // Apply power to motors
            frontLeft.setPower(frontLeftPower);
            frontRight.setPower(frontRightPower);
            backLeft.setPower(backLeftPower);
            backRight.setPower(backRightPower);

            // Telemetry
            telemetry.addData("Drive", "%.2f", drive);
            telemetry.addData("Strafe", "%.2f", strafe);
            telemetry.addData("Turn", "%.2f", turn);
            telemetry.update();
        }
    }
}@TeleOp(name = "X-Drive")
class XDrive : LinearOpMode() {
private lateinit var frontLeft: DcMotor
private lateinit var frontRight: DcMotor
private lateinit var backLeft: DcMotor
private lateinit var backRight: DcMotor
override fun runOpMode() {
// Initialize motors
frontLeft = hardwareMap.get(DcMotor::class.java, "front_left")
frontRight = hardwareMap.get(DcMotor::class.java, "front_right")
backLeft = hardwareMap.get(DcMotor::class.java, "back_left")
backRight = hardwareMap.get(DcMotor::class.java, "back_right")
// Reverse right side motors
frontRight.direction = DcMotor.Direction.REVERSE
backRight.direction = DcMotor.Direction.REVERSE
waitForStart()
while (opModeIsActive()) {
// Get joystick inputs
val drive = -gamepad1.left_stick_y.toDouble() // Forward/backward
val strafe = gamepad1.left_stick_x.toDouble() // Left/right
val turn = gamepad1.right_stick_x.toDouble() // Rotation
// Calculate power for each motor
// The math works because of the 45° motor angles
var frontLeftPower = drive + strafe + turn
var frontRightPower = drive - strafe - turn
var backLeftPower = drive - strafe + turn
var backRightPower = drive + strafe - turn
// Find the maximum power value
val maxPower = maxOf(
Math.abs(frontLeftPower),
Math.abs(frontRightPower),
Math.abs(backLeftPower),
Math.abs(backRightPower)
)
// Normalize powers if any exceeds 1.0
if (maxPower > 1.0) {
frontLeftPower /= maxPower
frontRightPower /= maxPower
backLeftPower /= maxPower
backRightPower /= maxPower
}
// Apply power to motors
frontLeft.power = frontLeftPower
frontRight.power = frontRightPower
backLeft.power = backLeftPower
backRight.power = backRightPower
// Telemetry
telemetry.addData("Drive", "%.2f".format(drive))
telemetry.addData("Strafe", "%.2f".format(strafe))
telemetry.addData("Turn", "%.2f".format(turn))
telemetry.update()
}
}
}Power Normalization: When combining drive, strafe, and turn, the total power can exceed 1.0. We normalize by dividing all powers by the maximum to keep values in the valid range while maintaining the correct ratios.
Understanding the X-Drive Math
The formulas might look confusing, but here's what's happening:
- Forward/Backward: All motors spin the same direction (drive)
- Strafe Left/Right: Front-left and back-right spin opposite to front-right and back-left (strafe)
- Rotate: Left motors spin opposite to right motors (turn)
Each motor's power is a combination of these three movements. The 45° angle of the motors naturally creates the strafing motion!
Other Holonomic Options
Mecanum Drive:
- Uses special mecanum wheels with angled rollers
- Similar control to X-Drive
- More complex math with vector decomposition
- Popular but requires precise wheel alignment
H-Drive:
- Three or four regular omni wheels plus a center strafe wheel
- Simpler mechanically than X-Drive
- The center wheel handles strafing
- Good for beginners but less efficient
Why X-Drive is good for learning:
- No complex vector math needed
- Intuitive motor power calculations
- Works with standard omni wheels
- Easy to understand how each movement affects the motors
Want to learn more about drivetrain designs? Check out Game Manual 0's comprehensive guide to drivetrains for in-depth comparisons, build tips, and advanced options.
Button Mapping for Mechanisms
Buttons are perfect for controlling other parts of your robot like arms, claws, and intakes.
Simple Button Control
// In your main loop
while (opModeIsActive()) {
    // Claw control - press A to close, B to open
    if (gamepad1.a) {
        clawServo.setPosition(0.0); // Closed
    } else if (gamepad1.b) {
        clawServo.setPosition(1.0); // Open
    }

    // Intake control - hold X to run intake
    if (gamepad1.x) {
        intakeMotor.setPower(1.0);
    } else {
        intakeMotor.setPower(0.0);
    }

    // Arm control with left trigger and right trigger
    double armPower = gamepad1.right_trigger - gamepad1.left_trigger;
    armMotor.setPower(armPower);
}
// In your main loop
while (opModeIsActive()) {
// Claw control - press A to close, B to open
if (gamepad1.a) {
clawServo.position = 0.0 // Closed
} else if (gamepad1.b) {
clawServo.position = 1.0 // Open
}
// Intake control - hold X to run intake
if (gamepad1.x) {
intakeMotor.power = 1.0
} else {
intakeMotor.power = 0.0
}
// Arm control with left trigger and right trigger
val armPower = gamepad1.right_trigger.toDouble() - gamepad1.left_trigger.toDouble()
armMotor.power = armPower
}Toggle Button (Advanced)
Sometimes you want a button to switch between two states (like an on/off switch). This requires tracking the previous button state:
private boolean intakeOn = false;
private boolean previousY = false;

// In your main loop
while (opModeIsActive()) {
    // Detect button press (not hold)
    boolean currentY = gamepad1.y;
    if (currentY && !previousY) {
        // Button was just pressed - toggle
        intakeOn = !intakeOn;
    }
    previousY = currentY;

    // Apply the state
    if (intakeOn) {
        intakeMotor.setPower(1.0);
    } else {
        intakeMotor.setPower(0.0);
    }

    telemetry.addData("Intake", intakeOn ? "ON" : "OFF");
    telemetry.update();
}
private var intakeOn = false
private var previousY = false
// In your main loop
while (opModeIsActive()) {
// Detect button press (not hold)
val currentY = gamepad1.y
if (currentY && !previousY) {
// Button was just pressed - toggle
intakeOn = !intakeOn
}
previousY = currentY
// Apply the state
if (intakeOn) {
intakeMotor.power = 1.0
} else {
intakeMotor.power = 0.0
}
telemetry.addData("Intake", if (intakeOn) "ON" else "OFF")
telemetry.update()
}Improving Control Feel
Deadzone
Joysticks often don't return exactly 0.0 when centered. Add a deadzone to ignore tiny movements:
public double applyDeadzone(double value, double deadzone) {
    if (Math.abs(value) < deadzone) {
        return 0.0;
    }
    return value;
}

// Use it like this:
double drive = applyDeadzone(-gamepad1.left_stick_y, 0.1);
double turn = applyDeadzone(gamepad1.right_stick_x, 0.1);
fun applyDeadzone(value: Double, deadzone: Double): Double {
if (Math.abs(value) < deadzone) {
return 0.0
}
return value
}
// Use it like this:
val drive = applyDeadzone(-gamepad1.left_stick_y.toDouble(), 0.1)
val turn = applyDeadzone(gamepad1.right_stick_x.toDouble(), 0.1)Speed Limiting
Make precise control easier by reducing maximum speed:
// Slow mode when holding left bumper
double speedMultiplier = gamepad1.left_bumper ? 0.4 : 1.0;

double leftPower = drive + turn;
double rightPower = drive - turn;

leftMotor.setPower(leftPower * speedMultiplier);
rightMotor.setPower(rightPower * speedMultiplier);
// Slow mode when holding left bumper
val speedMultiplier = if (gamepad1.left_bumper) 0.4 else 1.0
val leftPower = drive + turn
val rightPower = drive - turn
leftMotor.power = leftPower * speedMultiplier
rightMotor.power = rightPower * speedMultiplierCommon Mapping Patterns
Here's a typical control scheme many teams use:

Gamepad 1 (Driver):
- Left stick Y → Forward/backward
- Right stick X → Turning
- Left bumper → Slow mode
- Right bumper → Turbo mode
Gamepad 2 (Operator):
- Left stick Y → Arm up/down
- Right stick Y → Lift up/down
- A button → Close claw
- B button → Open claw
- X button → Intake in
- Y button → Intake out
- D-pad → Preset positions
Tips for Good Joystick Mapping
- Keep it intuitive — Forward on the stick should feel like forward on the robot
- Use both controllers — Driver focuses on moving, operator handles mechanisms
- Test with your drivers — What makes sense to you might not work for them
- Add telemetry — Show what each input is doing so you can debug easily
- Document your controls — Write down what each button does for your drivers!
Next Steps
Once you have basic joystick mapping working, you can move on to more advanced topics like:
- Adding ramping to prevent jerky movements
- Implementing field-centric control for mecanum drives
- Creating preset positions with PID control