
Transfers
Move game pieces reliably between mechanisms, with consistent alignment, feed timing, sensing, and jam recovery.
A transfer moves an object from one to another. Reliability depends on maintaining control during the handoff, including when the two mechanisms are slightly misaligned.
Intake and transfer
An collects an object from the field. A transfer delivers it to the next mechanism in a usable condition. On a ball-handling , a feeder often controls the last part of that path into the launcher.
These jobs may use similar-looking rollers, but their requirements differ:
| Part of the path | Main job | Useful measurements |
|---|---|---|
| Intake | Collect from varied approach positions | Capture area, pickup time, rejects, driver corrections |
| Transfer | Deliver to a known location or contact path | Position, orientation, speed, spin, jams |
| Feeder | Release objects at a controlled time and spacing | Missed feeds, double feeds, interval between objects |
An intake still needs to collect reliably. It can accept a wide range of starting positions while guides and later contacts reduce that variation. By the time the object reaches a narrow claw or launcher, its arrival should be much more predictable.
Handoff geometry
Describe the object's position and orientation at entry, the path through the handoff, and its final retained pose. Decide which surfaces constrain it at every stage. An unsupported gap allows motion that the receiving mechanism may not tolerate.
Align donor and receiver so the object follows a short, predictable path. A guide or passive funnel can absorb some error, but it must not wedge the object.
For a roller path, inspect the gaps between contacts as well as the rollers themselves. A piece that briefly loses support can bounce, turn, or arrive at a different height. Use a view from the side and another from above to check the path.
Ball transfers
Before choosing roller material or speed, define how the ball should enter the next mechanism: centered or offset, at what height, moving how fast, and with what range of spin. Then test whether those differences affect the shot.
Compliant wheels can provide useful contact despite ball variation. Belts, tubing, and other surfaces can also work. Compare traction, wear, compression, and repeatability on your actual objects rather than choosing from appearance alone.
An opposing roller can change both translation and spin. It does not automatically cancel spin: direction, surface speed, compression, and slip all matter. Check that the contact sends the ball where intended rather than squeezing it against a closed gate.
Make roller spacing adjustable during prototyping. Test the smallest, largest, and most worn representative objects, then secure the chosen geometry so it does not drift during driving.
Concurrent motion
For a claw-to-claw handoff, the receiver can establish retention before the donor releases. The overlap must not make the two mechanisms fight over incompatible positions. Check contact geometry, , and the order of motion.
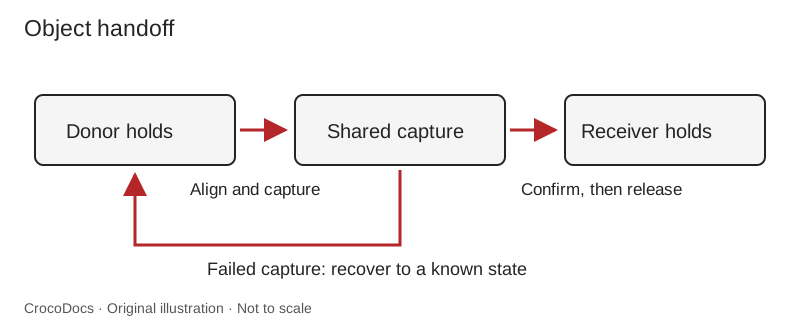
The diagram shows control ownership, not a universal timing sequence. A roller transfer, a gravity chute, and a claw handoff require different physical evidence.
Alignment tolerance
The nominal position is only one point in a range. Include flex, slide play, arm deflection, , variation, and the object's position inside the donor. A narrow receiver may work on a bench and miss after the robot turns.
For an illustrative one-dimensional check, suppose combined lateral error can reach 3 mm on either side. A capture opening with only 2 mm allowance per side is insufficient even if the nominal centers coincide. The final geometry also needs angular and vertical checks, and the guide must retain the object without excessive force.
Use shared by both mechanisms where practical. Tune the receiving geometry rather than requiring a offset for every hand-assembled revision.
Mechanism states
Define states using what the mechanism has established: donor holding, aligned, receiver capturing, capture confirmed, donor releasing, and transfer complete. A command to close a claw establishes a request, not necessarily successful retention.
A beam break, limit switch, camera, or other suitable can provide evidence, but each has an operating range and possible false readings. Define what a sensor detects and how it is validated. See sensor integration for mounting and measurement checks and vision overview for programming context.
If confirmation is unavailable, use tested timing with an honest and recovery path. Do not label an uncertain handoff as confirmed. A retry should return the mechanism to a physically understood state before trying again.
Feed timing
A launcher and its feeder need to be tested together. The feeder may be unable to deliver objects quickly enough, while the launcher may need more time to recover its speed or maintain acceptable accuracy. Either can limit the useful firing rate.
Measure a complete sequence, not just one successful shot. Record when each object enters, wheel speed before and after contact where available, the next release time, and the shot result. A ball-presence sensor can help distinguish a late feed from slow launcher recovery.
Giving the ball more entry speed can change the energy and contact needed at the launcher. It can also change spin and trajectory. Measure the result; faster feeding is not automatically better or a guaranteed cure for wheel-speed drop.
Agree with the programmers on a release condition. For example, release one object when it is staged, the launcher is within its tested speed range, and any aiming mechanism is ready. Confirm passage or use a bounded, tested release window before staging the next object. See Flywheels and launchers for speed recovery.
Gates and jams
Do not keep driving a loaded roller against a blocked object. A can draw substantial current while stalled, heat up, and pull down the shared supply .
Separate intake and transfer actuation when independent stopping is needed and the robot's motor and power allows it. Other options include a controllable gate, a disengaging contact, or stopping the shared path when full. Choose the arrangement from the complete behavior you need.
| State | Intended behavior | Exit or fault |
|---|---|---|
| Loading | Move an object toward the staging point | Staging sensor detects it, or loading times out |
| Staged | Retain the object without a stalled drive | Launch request and tested readiness conditions |
| Feeding | Admit one object to the launcher | Passage detected, or feed times out |
| Recovery | Stop or perform a tested clearing movement | Return to a known state, or stop and alert the driver |
This is a starting sequence, not a universal sensor arrangement. A sensor reports what is in its detection region; it may not prove the whole ball has cleared the launcher. Place it and interpret it accordingly.
Limit retries. Reversing a jam can send an object back into an intake or another mechanism, so test the recovery path too. Remove power and wait for moving parts to stop before clearing a jam by hand.
Failure testing
Vary object orientation, donor position, receiver offset, payload, and simultaneous robot motion one factor at a time before testing combinations. Include misses and deliberately incomplete capture. Verify that recovery does not throw the object into another mechanism.
Record success rate, handoff time, jams, and recovery outcomes alongside the robot revision. Also test worn guides and the least favorable allowed mechanism positions. A freshly adjusted handoff at its nominal position can hide failures that occur during a match.
For a ball path, include a full load, changing object order, repeated launch sequences, and driving while transferring. Check for double feeds, voltage-related failures, hot motors, and sensor readings that remain stuck after an object leaves. Use Testing and reliability to keep the results comparable.